Initially the Masking page appears with the loaded images in the left display area.

Averaging Frames
To obtain an appropriate data set for masking it is recommended to average the dynamic frames within an appropriate range. The range can be specified by the From and To numbers or using the slider handles. When the Aver button is activated, the average uptake in the specified frame range is calculated and the result image shown on the Averaged sub-pane.
Segmentation for Creating a Mask
The next step consists of generating segments which represent tissues of interest. The segments can then be combined into a single mask. Segmentation can be performed on the Averaged images, but also on the dynamic Input series, depending on which tab is selected. The Histogram of the pixel values is updated according to the selected images.
Select one of the segmentation methods (described below) to specify an inclusion criterion. If the Ovr box is checked, the pixels which satisfy the criterion are colored in the image overlay. Note that overlay updating might be slow when changing a segmentation parameter, depending on the segmentation method.
Segmentation performs the actual segmentation and shows the result in the Mask tab to the right. While standard segmentations create binary images with 0 (background) and 1 (segment) pixel values, there are clustering approaches which generate multiple segments in a single calculation. These segments are distinguished by increasing integer pixel values. Each Segmentation activation overrides the previous contents in Current.
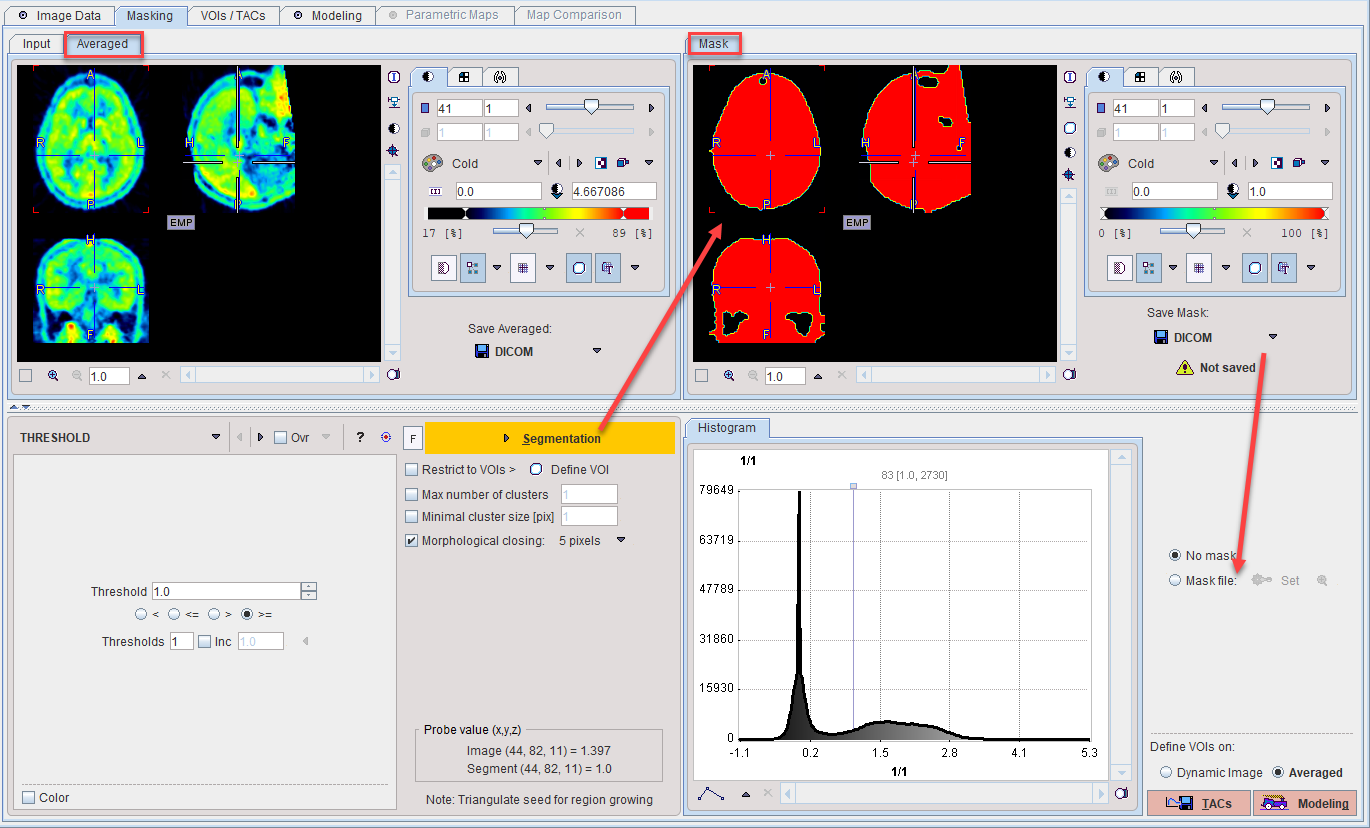
In certain circumstances, the segmentation methods alone may not be sufficient to separate an object form other structures. If this happens, the user can defined a VOI which prevents segmentation from leaving the area of main interest. To do so, the Restrict to VOI(s) box has to be enabled and the Define VOI button activated. The VOI tools interface appears and allows drawing a VOI. Outline the VOI. Quit the VOI tools with the OK button to confirm the VOI selection. Finally, activate the Segmentation button to perform the actual segmentation within the VOI. The result is shown in the Mask tab to the right.
Saving the Mask for Model Processing
In order to use a generated segment image as a mask in model processing it must be saved as a file and configured. Saving can be performed using the Save Mask button in any of the supported image formats. Note that automatically the mask configuration button switches from No Mask to Mask by File, and the saved file is configured. If the mask is not saved, a dialog window will appear when proceeding to the next processing step for mask saving.
If a mask file already exists, the interactions described above are not necessary and it can be simply configured with the Set button after enabling Mask file. The ![]() button next to Set can be used to load the specified mask and show it in a dialog window.
button next to Set can be used to load the specified mask and show it in a dialog window.
Note that the saved mask is not binary in the case of multiple segments, so that the segments can be recovered. However, during pixelwise calculation only the non-zero mask pixels will be processed, while the other pixels are blanked by NaN values.
How To Continue
There are two ways to continue. If you do not want to interactively outline VOIs then use the Modeling button to proceed to the Modeling page. Otherwise first configure the image on which the VOIs should be outlined (Dynamic Image, Averaged), and then select the TACs button.