VR Principle
VR objects are computed from all the data, not just from a derived surface. The method is based on ray tracing from a certain viewpoint. Rays are cast through the image volume, and the ray values recorded when they pass a plane behind the object, thereby producing an image.
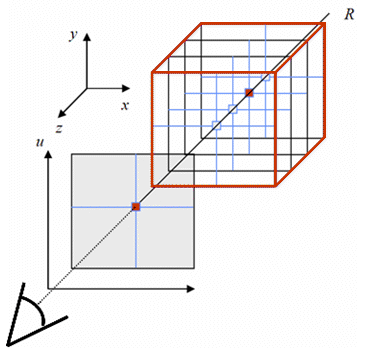
Each voxel is regarded as a "particle" that emits a certain color and absorbs a fraction of the passing light from the other voxels along the same ray.
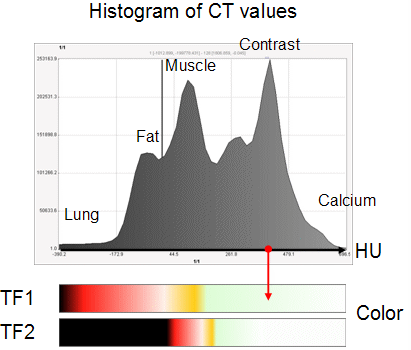
The color transfer function (TF) describes the voxel color as a function of the voxel value. For CT data, for example, the voxel values range from -1000 to 3000, and color mappings as illustrated below are often used.
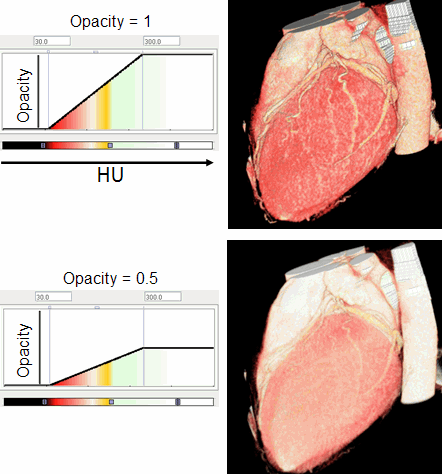
The opacity function describes the voxel opacity for the ray as a function of the voxel value. Opacity values range from 0 to 1, whereby 0 means full transparency, and 1 full opacity. Often, ramp functions are applied as illustrated below. If lower opacity values are used as in the lower example, information from the inner of the object may become apparent such as the contrast agent in the ventricular cavity.
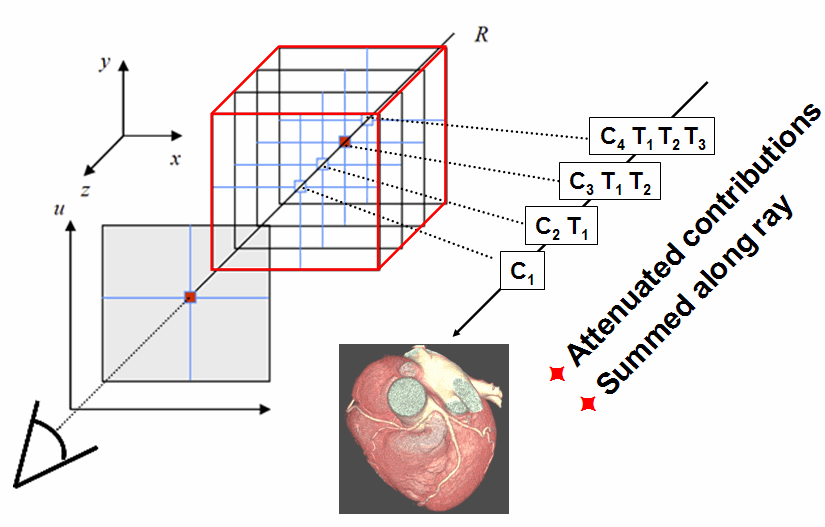
The ray value (the VR image pixel color) is calculated by summing up the contributions along a ray as illustrated below. Ci denotes the color of a voxeli , and Ti the transparency (1-opacity) of a voxel. Contributions of voxels far from the surface will be attenuated by multiple intervening voxels and thus be faint, depending on the opacity function.
VR Implementation in P3D
The properties tab Volume of VR objects shows several elements.
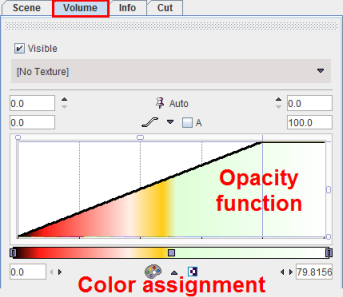
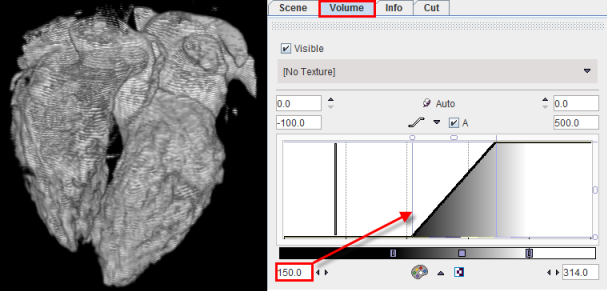
The Visible box serves for hiding the VR object altogether. The Texture selection allows combining volume rendering with color texturing from a matched study. The lower part of the tab contains the elements for defining the color and opacity transfer functions. The Auto refresh button serves for enabling/disabling automatic updating the display after any settings has been changed.
Opacity Functions
There are different shapes of opacity functions which can be selected using the arrow button highlighted below.
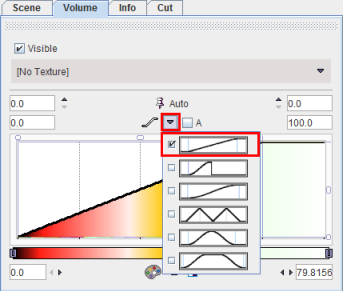
The purpose of the different shapes is to implement a variety of weighting functions, so that certain intensity ranges can be emphasized or suppressed. Usually, the ramp function is applied.
Once an opacity function has been selected, it can be manipulated in several ways as illustrated below:
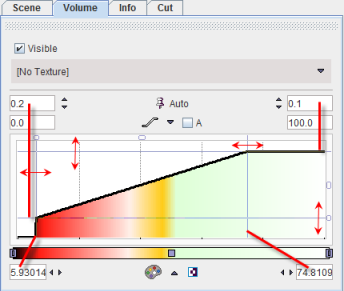
1.The opacity value is in the vertical direction. The minimal and the maximal values of the opacity function can be set numerically or by dragging the horizontal handle lines. Example: 0.2 (= minimal opacity), 0.1 (= transparency at highest opacity)
2.The pixel value is in the horizontal direction. The min/max range of the transfer function can be specified as absolute numbers (if the A box is checked), or in relative percent values (if the A box is not checked as in the example). This is only for the convenience of transfer function adjustments and has no impact on the rendering. The range can be specified by entering numbers directly (example: 5.9, 74.8), or by dragging the vertical handle lines.
3.Sometimes the transfer function should be defined in a small sub-range of the entire value range. In this case the x-range can be zoomed by changing the limits of the display range. The example above displays the whole range from 0% to 100%.
Color Transfer Functions
There are different color transfer functions available as illustrated in the example below.
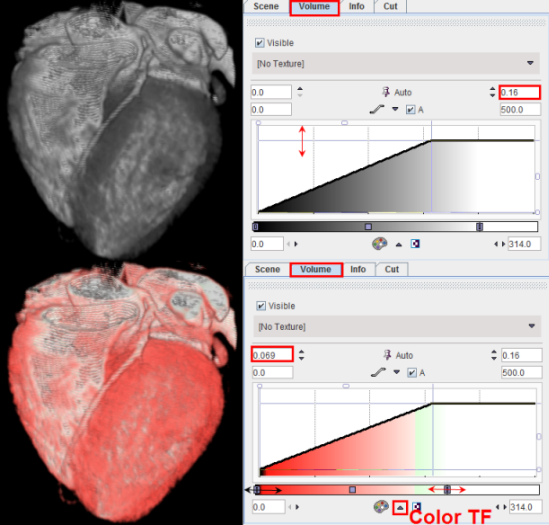
The upper rendering of the angio CT uses a gray color TF, and the lower rendering the Heart VR color TF. Note the indicated down arrow button which allows selecting among the available color TF. After a color TF has been chosen, the mapping of voxel values to colors can be adjusted by moving the upper/lower color TF limits as indicated by the horizontal arrows above. The Heart VR table makes lower values look fleshy, and higher values white.
Note: With big data sets refreshing of scenes with VR objects may be quite time-consuming. In this case it is recommended to switch the Auto refreshing to off. As soon as the VR properties are changed, the ![]() alert icon appears in the taskbar to the right. Once all VR properties have been adjusted, the user can trigger scene refresh by clicking at
alert icon appears in the taskbar to the right. Once all VR properties have been adjusted, the user can trigger scene refresh by clicking at ![]() .
.
Increasing the lower value of the opacity function allows cutting pixels with the density of myocardium, and the result only shows the contrast filled ventricles and the coronary arteries.
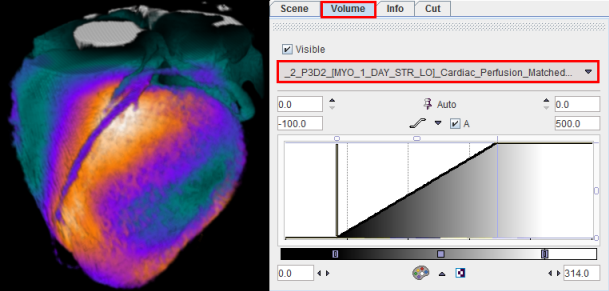
Volume rendering can also be combined with textures to introduce functional information into an anatomical rendering. The example below shows such a 3D fusion rendering of an angio CT combined with the texture color from a matched SPECT perfusion scan. The opacity function is linear and with the same range as above.
1.Notes:
The 3D fusion result also depends on the color and window level settings of the texture study which can be changed on the Input tab.
2.Voxels in the segment which have values below the lower or above the upper thresholds of the texture color table obtain the color of the selected color TF (Gray scale in the example above).